Creating a Simple Web Calculator with R and HTML: A Beginner's Guide Using Plumber
3 comments
Introduction
Ever wondered how to connect R's computational power with a web interface? In this tutorial, we'll create a simple web calculator that uses R as its backend. No fancy frameworks needed - just basic R and HTML!
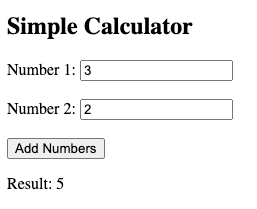
What We'll Build
A simple web calculator that:
- Takes two numbers as input
- Sends them to an R function
- Returns and displays the sum
It looks like this!

Prerequisites
- R installed on your computer
- The
plumberpackage in R - A text editor
- A web browser
Step 1: Creating the R Backend
First, we'll create our R API. Create a new file called simple_api.R and add this code:
library(plumber)

#* @filter cors
function(req, res) {
  res$setHeader("Access-Control-Allow-Origin", "*")
  res$setHeader("Access-Control-Allow-Methods", "GET, POST")
  res$setHeader("Access-Control-Allow-Headers", "Content-Type")
  plumber::forward()
}

#* Add two numbers
#* @param num1 First number
#* @param num2 Second number
#* @get /add
function(num1, num2) {
    num1 <- as.numeric(num1)
    num2 <- as.numeric(num2)
    result <- num1 + num2
    print(paste("Adding:", num1, "+", num2, "=", result))
    return(list(result = result))
}
This code:
- Creates a simple API endpoint at
/add - Takes two numbers as parameters
- Returns their sum
- Includes CORS headers for web browser access
Step 2: Creating the Web Interface
Create a new file called calculator.html:
<!DOCTYPE html>
<html>
<head>
    <title>Simple Calculator</title>
</head>
<body>
    <h2>Simple Calculator</h2>

    Number 1: <input type="number" id="num1"><br><br>
    Number 2: <input type="number" id="num2"><br><br>

    <button onclick="calculate()">Add Numbers</button>

    <p id="result"></p>

    <script>
        function calculate() {
            var num1 = document.getElementById('num1').value;
            var num2 = document.getElementById('num2').value;

            fetch(`https://localhost:8000/add?num1=${num1}&num2=${num2}`)
                .then(response => response.json())
                .then(data => {
                    document.getElementById('result').innerHTML = 'Result: ' + data.result;
                })
                .catch(error => {
                    console.error('Error:', error);
                    alert('Error calculating');
                });
        }
    </script>
</body>
</html>
Step 3: Running the Application
Start the R API:
- Open R
- Run these commands:
library(plumber)
pr <- plumber::plumb("simple_api.R")
pr$run(port=8000)
Open the HTML file:
- Double-click the
calculator.htmlfile - It should open in your default web browser
- Double-click the
How It Works
When you click the "Add Numbers" button, JavaScript:
- Gets the values from both input fields
- Sends them to the R API using
fetch - Waits for the response
- Displays the result
The R API:
- Receives the numbers
- Converts them to numeric values
- Adds them together
- Returns the result as JSON
Common Issues and Solutions
"Error calculating" alert:
- Make sure R is running the API
- Check that you're using port 8000
- Look for errors in the R console
Nothing happens:
- Open browser developer tools (F12)
- Check the Console tab for errors
- Verify both numbers are entered
Next Steps
You can expand this basic example by:
- Adding more operations (subtract, multiply, divide)
- Styling the page with CSS
- Adding input validation
- Creating a more complex calculator
Conclusion
This simple example demonstrates how to:
- Create a basic R API
- Connect it to a web interface
- Handle user input and display results
While basic, this pattern forms the foundation for more complex web applications powered by R's analytical capabilities.
Happy coding! 🚀
Comments