Recommended Posts


How I Made Hive Links (hive://) Work in WordPress and Elementor
13 comments
Hey everyone,
I wanted to share a quick tip for anyone who uses Hive Keychain and wants to let people take Hive actions directly from their website — especially if you use QR codes or buttons for things like event tickets.

📌 The Problem
WordPress uses a filter called kses_allowed_protocols to define which link protocols are "safe".
By default, http, https, mailto, etc. are allowed — but hive is not.
If you try to add a link like hive:// in a button or icon box, it just gets stripped away or removed completly when you save it - in the Frontend.
But sometimes we want to share Hive-Links for Transfers etc. and they should just work.
I noticed that it does work if you add a plain hive:// link in a normal text editor widget as raw HTML — but not in dedicated link fields like buttons or widgets like from Elementor Page-Builder.
📌 Why I Needed This
From time to time I have to deal with websites where I would like to integrate direct Hive links - e.g. pay for something in a store or book a ticket for an event and would like to pay with Keychain.
✅ The Solution
The fix is super simple...
WordPress filters which link protocols are allowed through an internal whitelist called kses.
If your protocol (like hive://) is not on that list, it’s removed to prevent abuse.
So all I needed to do was add hive to the allowed protocols.
And instead of messing with my functions.php or uploading extra plugin files, I decided to manage it easily with the Code Snippets plugin.
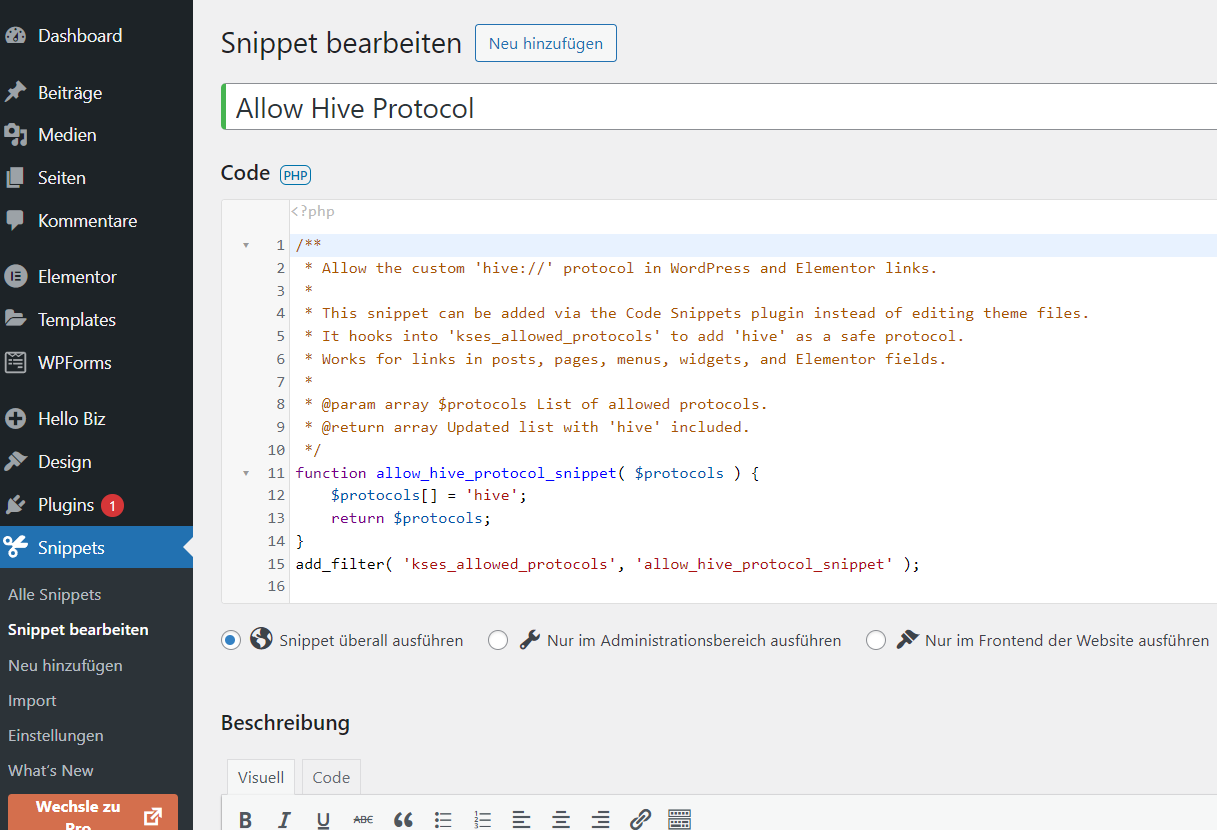
🗂️ The Snippet
Here’s the exact snippet I use:
/**
 * Allow the custom 'hive://' protocol in WordPress and Elementor links.
 *
 * This snippet can be added via the Code Snippets plugin instead of editing theme files.
 * It hooks into 'kses_allowed_protocols' to add 'hive' as a safe protocol.
 * Works for links in posts, pages, menus, widgets, and Elementor fields.
 *
 * @param array $protocols List of allowed protocols.
 * @return array Updated list with 'hive' included.
 */
function allow_hive_protocol_snippet( $protocols ) {
    $protocols[] = 'hive';
    return $protocols;
}
add_filter( 'kses_allowed_protocols', 'allow_hive_protocol_snippet' );
or simply without the explanation
function allow_hive_protocol_snippet( $protocols ) {
    $protocols[] = 'hive';
    return $protocols;
}
add_filter( 'kses_allowed_protocols', 'allow_hive_protocol_snippet' );
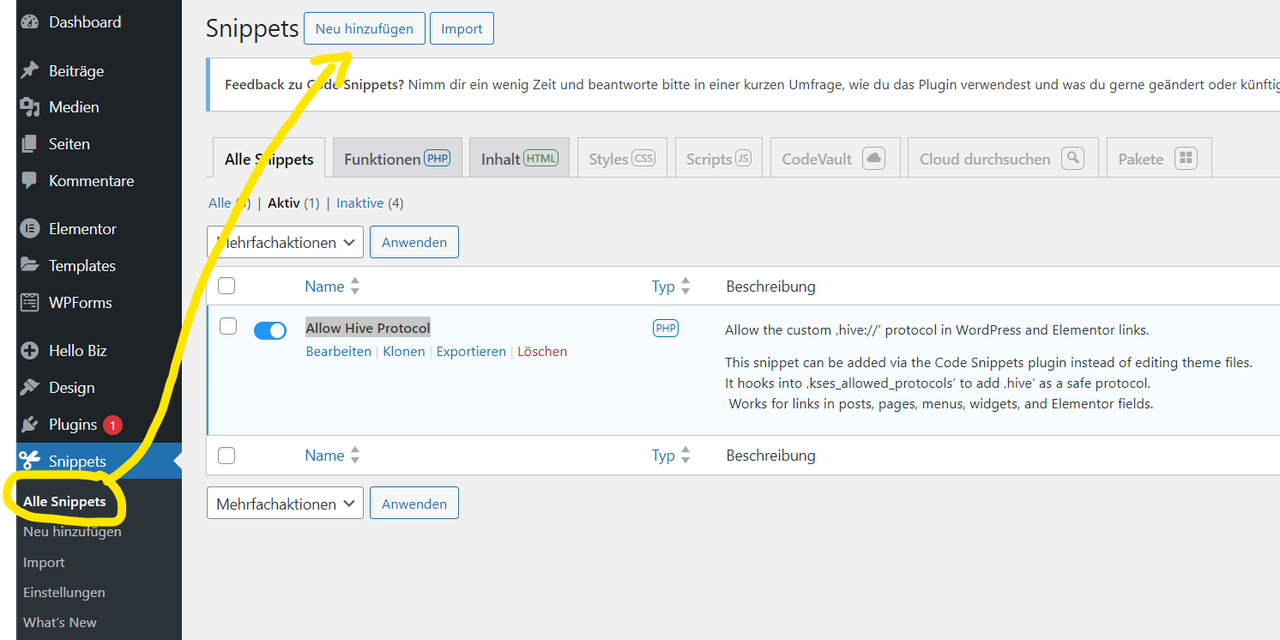
📌 How to use
- Go to WP Admin → Snippets → Add New
- Give your snippet a clear name, like Allow Hive Protocol
- Paste the code above into the code field.
- Choose Run snippet everywhere.
- Save and activate.
✅ That’s it!
No need to touch theme files or upload a custom plugin — all managed safely through Code Snippets Plugin. Wait... We need a Link to place! Therefore we go the Website from
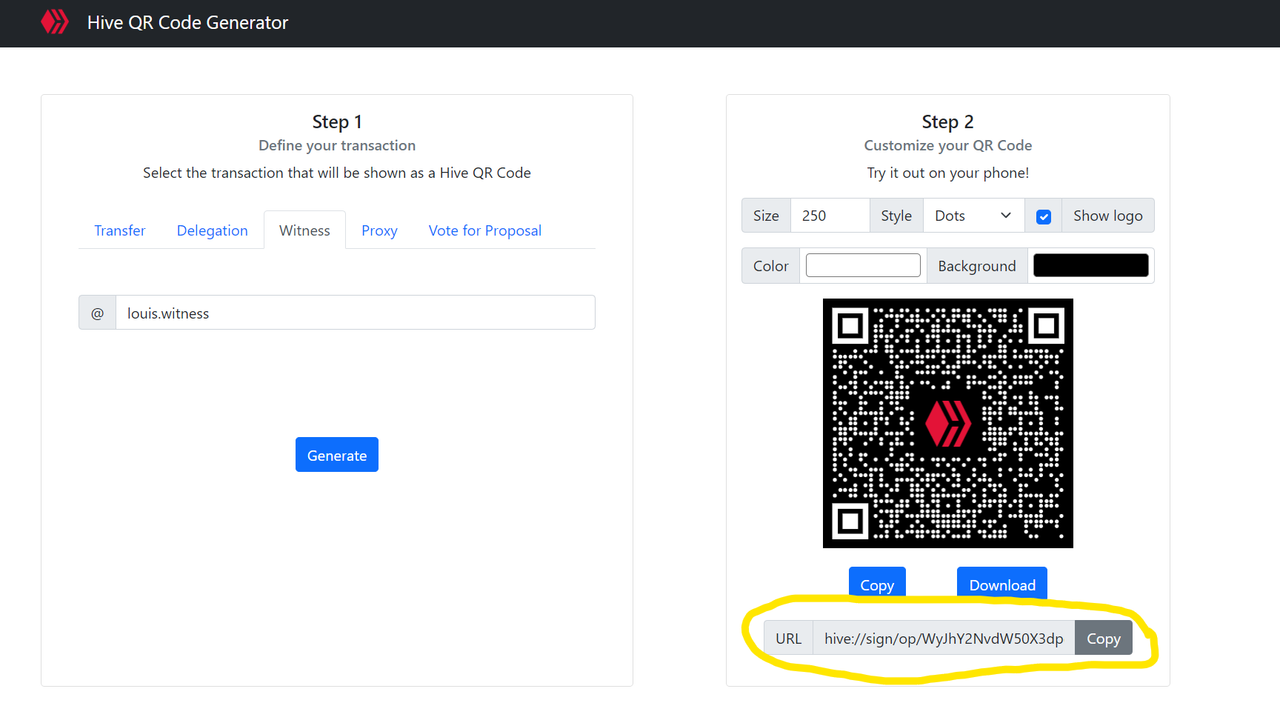
qr.hive-keychain.com
Here we now have the option of generating our own ready-made links for transfers, delegations, witness votes, proxies and proposal votes, which also work with the Hive Keychain browser extension or the mobile app. This is also the page I use when I want to create links, e.g. for the buy button on a page. In the screenshot above you can see what the URL looks like. This cannot be pasted into the browser line and must really be available as a link. As an example, you can now click
. When you click, your keychain should open and ask if you want to vote for my Witness. Of course you say yes, because supporting my Witness is always good :).Btw. This is the long Link for the above link:
hive://sign/op/WyJhY2NvdW50X3dpdG5lc3Nfdm90ZSIseyJ3aXRuZXNzIjoibG91aXMud2l0bmVzcyIsImFwcHJvdmUiOnRydWV9XQ..
And this the QR-Code:

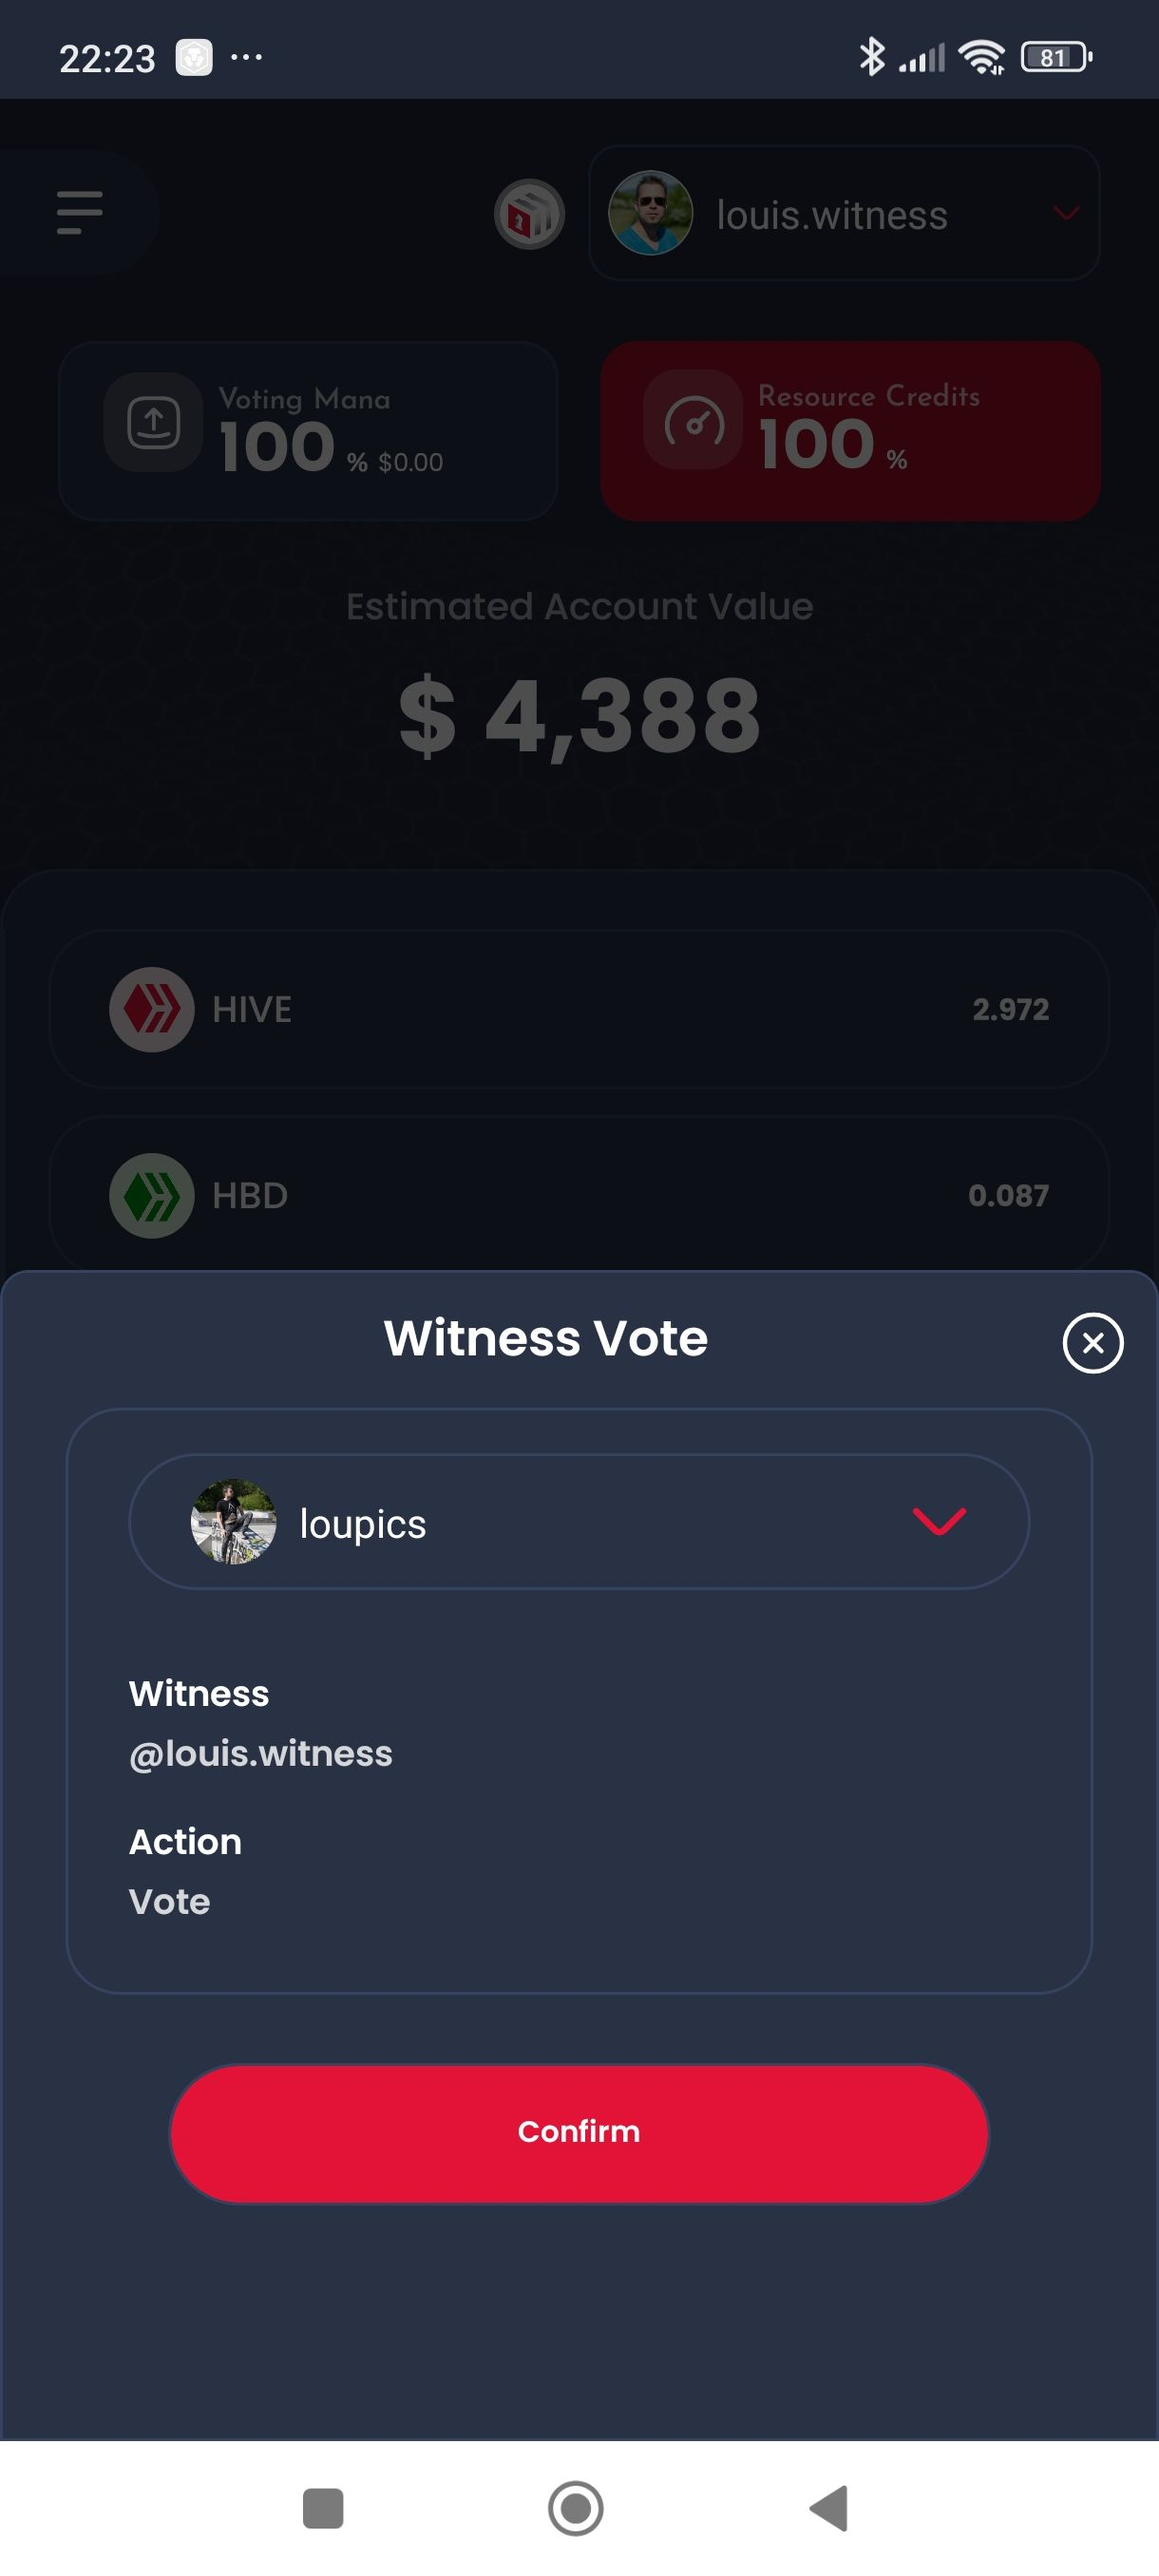
However, you can only use this QR code within the Hive Keychain app. So open the scanner in the app and then scan it. It takes a little while until it is recognized but it works, as you can see in the screenshot on the right.
That should be all for now. I now have the possibility to create different hive links that work wonderfully with the Keychain Browser Extension and thus add a payment button to different pages that have nothing to do with HIVE, for example, and pay with Keychain HIVE/HBD. Furthermore the possibility to create a QR code for the link. Now I'll soon be thinking about how far it would be possible to integrate these functions into an online shop/merch store or SAAS tailored to HIVE, as the recurring transfers are very interesting. Maybe I'll also think about a solution for a Woocommerce integration so that payments can be made at the checkout with Woocommerce using HBD/HIVE (once the extension is installed and I have a way to query our awesome 3 second transactions on an external page to see if the transfer has actually gone through and the order is complete).
Until then - hope this helps some of you who are working on your Wordpress website.
Comments